


Flexbox & Automatic Traffic Light
I just concluded a course on Flexbox and wow! It makes arranging elements in a responsive format so much easier than the traditional float or absolute/relative techniques.
What is Flexbox? MDN defines it as follows:
The CSS3 Flexible Box, or flexbox, is a layout mode providing for the arrangement of elements on a page such that the elements behave predictably when the page layout must accommodate different screen sizes and different display devices. For many applications, the flexible box model provides an improvement over the block model in that it does not use floats, nor do the flex container’s margins collapse with the margins of its contents. -Using Flexible Boxes, Mozilla Developer Network
This simply means: It’s simple! it’s predictable! and say goodbye to floats and collapsing parent elements and the need to use clearfixes!
Although it’s almost midnight as I am writing this, I am so excited to put Flexbox to use that I went ahead and refactored a small coding challenge I received last week to use Flexbox. The challenge was to build a simple traffic light in vanilla JS and CSS. The light would come on when clicked and the previously lit light would turn off. I completed the requirements and also went ahead and made the light automatic. When was the last time you got out of your car to switch the light? C’mon…


In the index.html I will create a parent div to serve as the traffic light body. The children divs will serve as the lights.

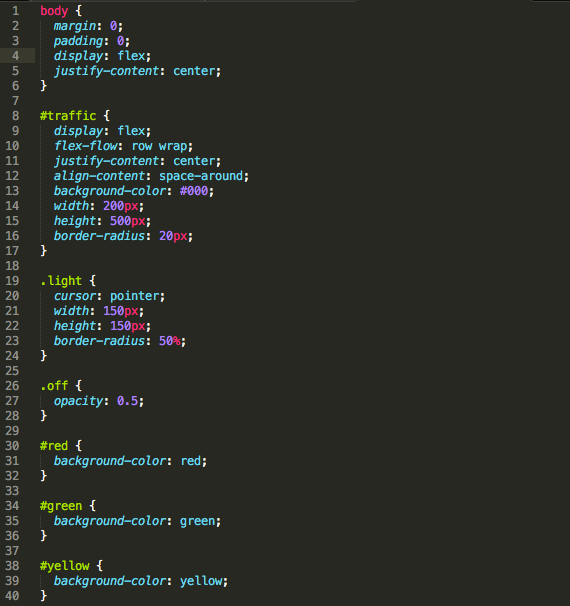
In the style.css I will initiate by resetting margin and padding to 0. I will then assign body the display: flex and the justify-content: center styles. This is telling the body to act as a Flexbox container and to justify the content in the center. The #traffic element is also assigned as a Flexbox element with display: flex. I then tell it to allow it’s child elements to ‘wrap’ or flow down to an additional row if not enough space is available in the existing row. This is done with the nowrap value within the flex-flow property. Again, I center the child elements using justify-content: center. The amazingness of Flexbox really shows in the next property, align-content. This property allows you to align all elements at the top, bottom or the center of the parent component. You can arrange the elements such that the empty space in the parent div is divided into equal parts and used as a ‘margin’ on either side of each element. Additionally, the elements can also be arranged such that the first and last element are anchored at its respective edge of the parent div and the ‘margin’ is provided to the inner elements. In my particular case, I used align-content: space-around so that the outermost elements would have space between them and the parent element. The following properties, width, height, and border-radius are simply for style.
The .light class properties create a circular div of 150px. The .off class is used to create the effect that the light is turned off. Since the background is black, assigning an opacity of 50% to any color will make it look darker.
The #red, #green, #yellow are used to assign each individual div its base color of red, green or yellow.

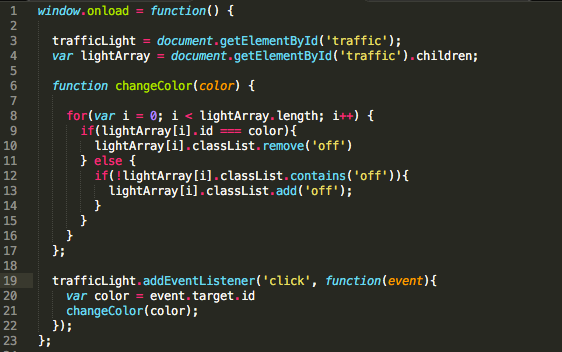
To add the functionality to change the color of the active light with a click I performed the following: Assigned the #traffic elements to the trafficLight variable. I then assigned all its children elements to the lightArray element. By default, the node.children function will return the children in an array. Although a more efficient way to access the .light elements could be done by document.querySelectorAll(‘.light’), I want to make use of the event delegation so as to not assign a click handler to each light element. This can be seen in lines 19–22. Although the click handler is attached to the#traffic element, the click event will bubble up from the children that was clicked with all it’s pertinent information, in our case, the color. I then call the changeColor function with the color of the light clicked. This function simply iterated over lightArray and removes the .off class from the clicked color and ensures that any other element has it.

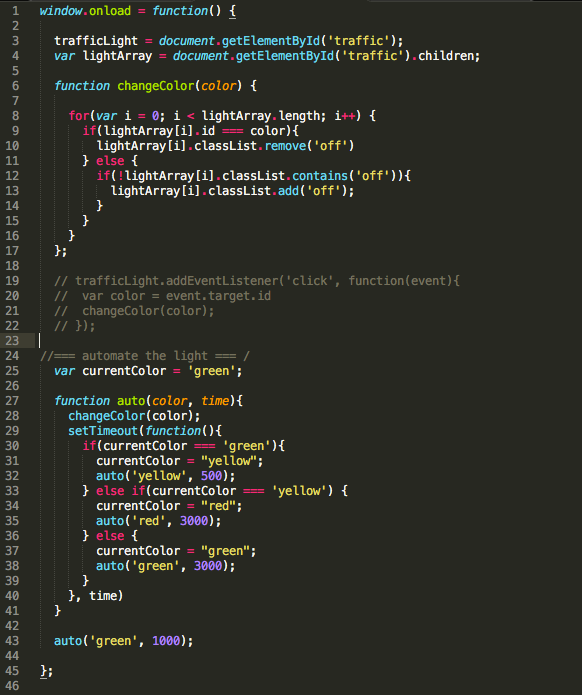
I created function auto in order to automate the light. It’s a simple function that utilizes setTimeout to call itself with arguments based on the previous call, and upon calling itself it calls changeColor.
I really enjoyed learning Flexbox and I highly advice taking a look at it if you haven’t. It will make your life much simpler! I plan to do a more thorough review of it in the near future as it’s well past my bedtime but I just had to get the word out about it!
Happy coding!

0 Comments